LSU for LAAS description
Indicators
Power ON indicator

This green LED has 3 modes:
It is lit continuously while the LSU for LAAS is switched ON.
It flashes rapidly (approx. twice per second) during the Device Test.
It flashes slowly (approx. once per second) while the Automatic Power-save Function is activated, if the Device Test is interrupted and when the battery is discharged.
External Power Indicator

This green LED is continuously lit while external AC- or DC-power is connected.
Failure Mode Indicator

The red LED is lit when a possible malfunction of the LSU for LAAS has been detected. If lit turn the LSU for LAAS OFF, and then ON again to check if the indication disappears. Provided that the indication does not occur again the LSU for LAAS can be operated. If the Indicator continues to be lit after three OFF/ON cycles and after replacing the battery with a fully charged battery, discontinue use and contact a Laerdal Service Center.
NOTE
Failure Mode Indication caused by external electrical interference may occur on any digital equipment including the LSU for LAAS. Such fault will usually not be repeated.
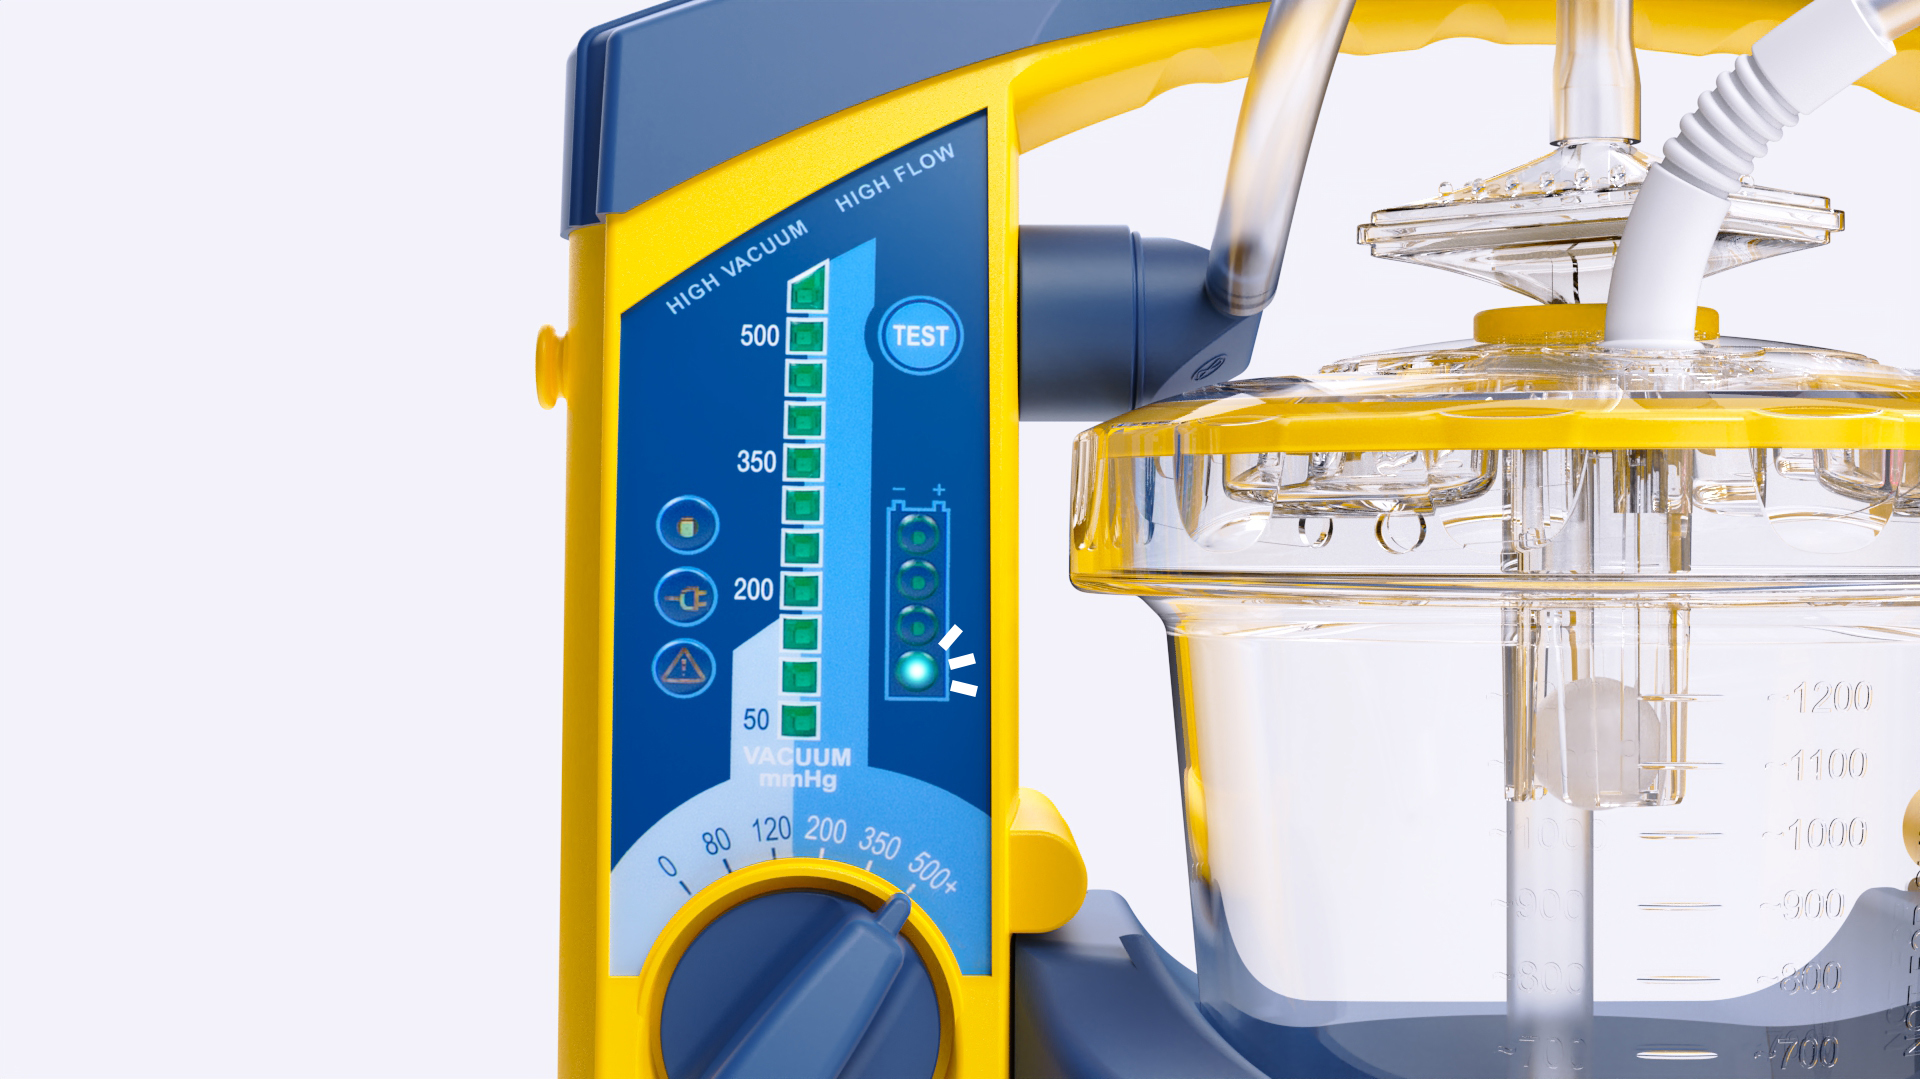
Vacuum indicator
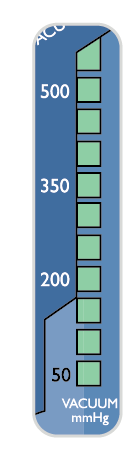
This green LED bar graph displays the actual vacuum level during operation of the LSU for LAAS. Each fully lit segment represents 50 mmHg. If a segment has a weak light, this represents 25 mmHg (e.g. 125 mmHg means 2 fully lit and 1 weakly lit segments).
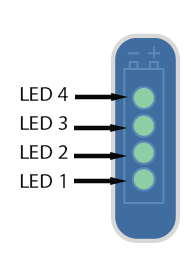
Battery status indicator

During operation from internal battery and during charging the displayed values must only be used as indications.
Several parameters can influence battery capacity e.g. device settings, state of battery, temperature etc.
This green LED bar graph has 3 functions:
During operation from internal battery - indicates approx. remaining battery capacity.
NOTE
Immediately after turning the LSU for LAAS ON and immediately after switching from external power to internal battery operation, all 4 LED’s will flash for 5 seconds before the remaining battery capacity is displayed. Due to the nature of voltage based battery capacity measurement, the battery status indication may differ from unit to unit. Each battery may vary in voltage versus remaining capacity, thus allowing for variability in the reading. Other outside variables such as temperature may also affect accuracy. The indication is targeted to show battery capacity as indicated below. The graph shows how the accuracy of the indication can vary.
TYPICAL REMAINING BATTERY CAPACITY (for a new battery stored in room temperature ) | OUTPUT |
|---|---|
> 50% | 4 LEDs lit. |
30 - 50% | 3 LEDs lit. |
20 - 30% | 2 LEDs lit. |
< 20% | 1 LED lit. |
Battery Low; (min. 1 minute of operation left based on 500+ mmHg/free flow). | 1 LED flashes. |
NOTE
If the LSU for LAAS or the NiMH battery has been stored at low temperatures (< 12 °C / < 54 °F), the LSU for LAAS may indicate lower remaining battery capacity than actual when first switched on. This is due to the nature of NiMH batteries. The battery indicator may flash on one LED, which normally indicates Battery Low. The LED may continue to flash until the LSU for LAAS temperature is above 12 °C / 54 °F and the LSU for LAAS is switched off and on again.
The low battery indication in this instance is not a correct indication of the residual battery capacity.
During charging - indicates approx. achieved battery capacity.
CAPACITY | OUTPUT* |
|---|---|
< 75% | The LED’s will be lit sequentially. |
75-80% | 3 LED’s lit and 4th flashing. |
> 80% | 4 LED’s lit. |
NOTE
If no battery is installed, the battery status indicator will be fully lit for approx. 5 sec. until it is automatically turned off.
During the Device Test - indicates which step of the test is currently in progress or which corresponding test result is being displayed:
LED 1 (lower LED) lit = STEP 1, LED 2 lit = STEP 2 etc.
TEST-Button
 |
This button allows you to run a 4-step user initiated Device Test program to identify whether the LSU for LAAS operates satisfactorily, is assembled correctly, or if it needs service:
STEP 1 - Checking for occlusions in the Suction System (including canister and tubing).
STEP 2 - Checking the vacuum build-up efficacy of the Pump System.
STEP 3 - Checking the max. achievable vacuum level of the LSU for LAAS. (reaches this level within 10 seconds).
STEP 4 - Checking for air leakage in the Pump System (including canister and tubing).
To indicate that the LSU for LAAS is in test mode, the Power ON Indicator will flash rapidly (approx. twice per second) until you exit the test program.
BEFORE YOU START THE DEVICE TEST
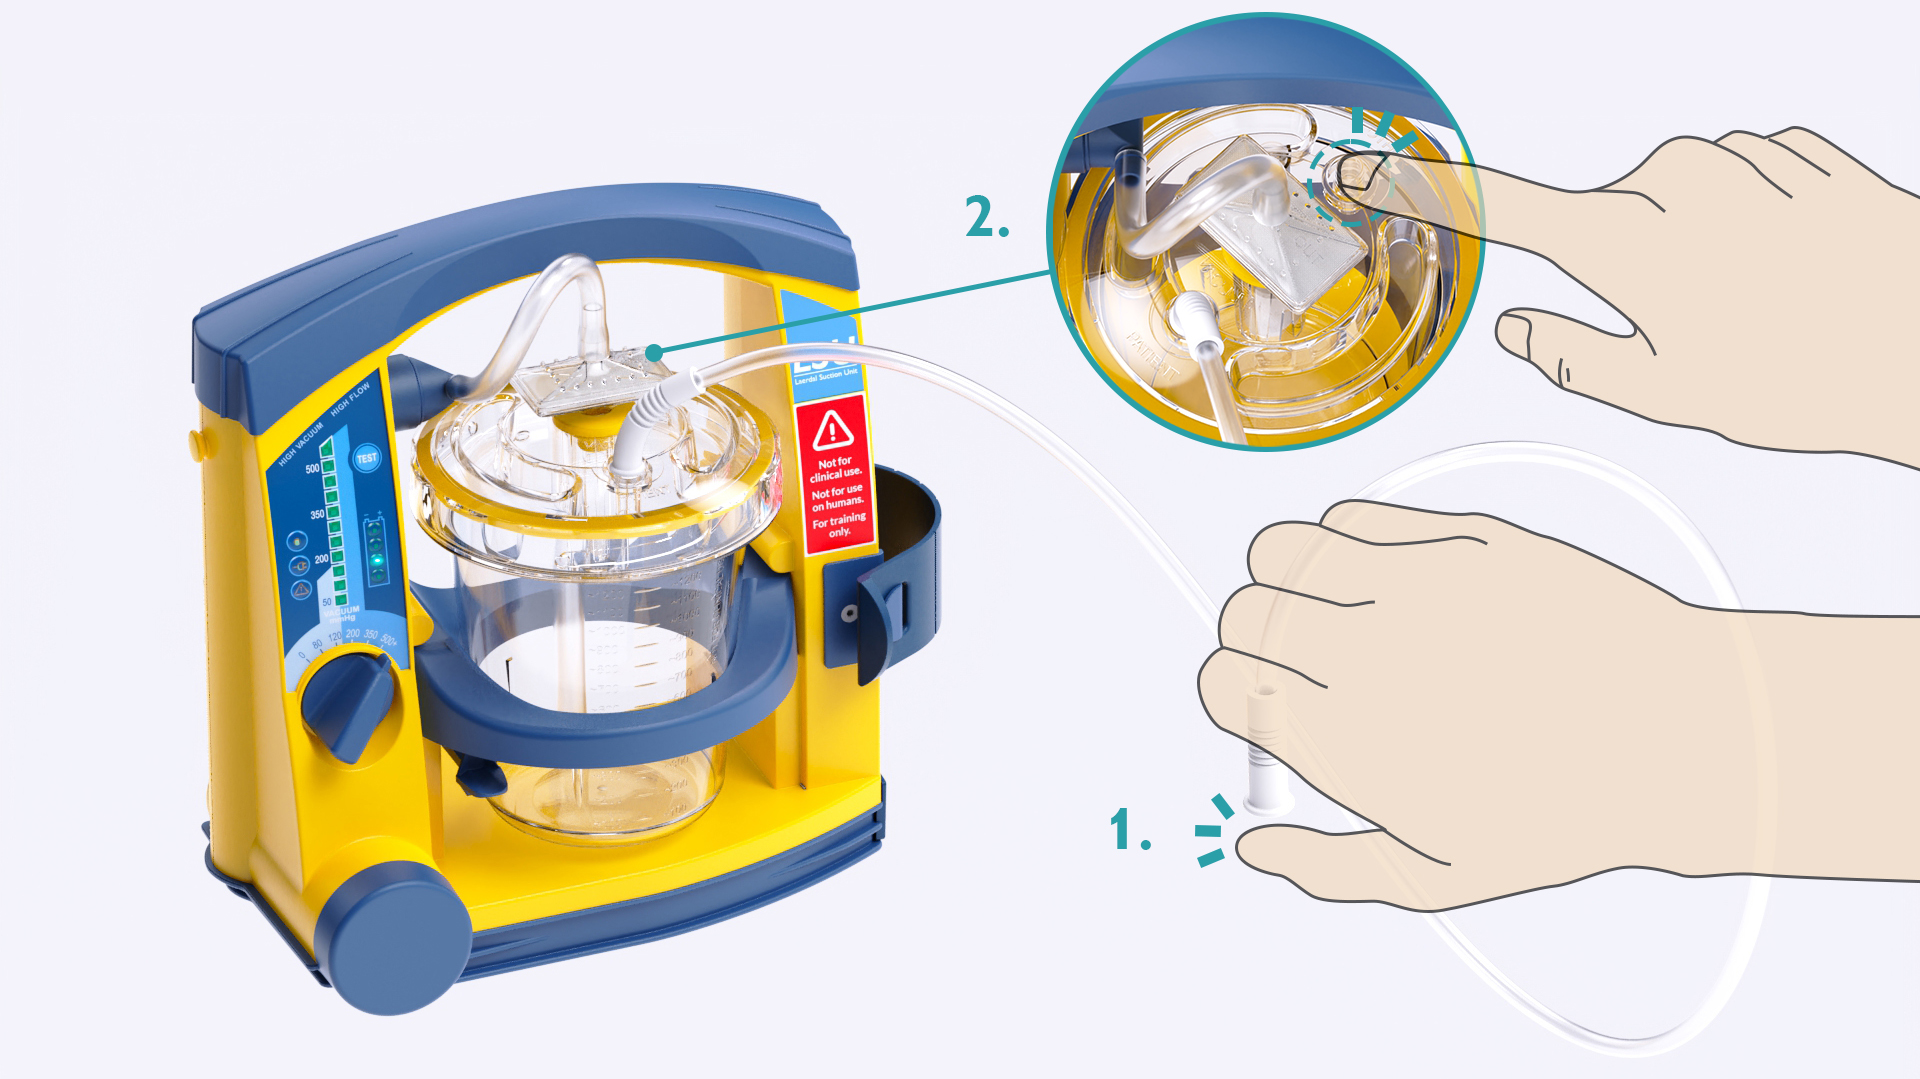
Before you press the TEST-Button, make sure the Patient Suction Tubing is not occluded or bent.
DEVICE TEST DESCRIPTION
Press and hold the TEST-Button while setting the Operating Knob to 500+ mmHg.

NOTE
Do not release the TEST-Button until min. 2 seconds after the Operating Knob has been set to 500+ mmHg. The test will start immediately.
As soon as LED 2 of the Battery Status Indicator comes on (takes approx. one second) fully occlude the Patient Suction Tubing (1.), and block the port on the canister labeled Other (2.)
NOTE
If the tubing is not occluded within 2 minutes, the test will be interrupted and the Power ON Indicator will start to flash slowly (approx. once per second).
Keep the tubing and Other port occluded until LED 1 comes on. To read the test results see next page.
NOTES
If you need to interrupt the test and revert to normal operation, turn the Operating Knob to another position and then select the required setting.
To restart the test, set the Operating Knob to “0” and then start over again.
TO DISPLAY THE TEST RESULTS
After the test, STEP 1 result is shown automatically.
Press the TEST button to display STEP 2–4.
Press again to repeat the results.
Turn the Operating Knob to another position to exit
TEST STEP DISPLAYED ON THE BATTERY STATUS INDICATOR | TEST RESULT DISPLAYED ON THE VACUUM INDICATOR | ACTION IF TEST FAILED |
|---|---|---|
STEP 1 - Occlusions | Test Passed: < 100 mmHg. | Check possible occlusions (e.g. twisted tubing) and run the Device Test again. |
STEP 2 - Vacuum Build-Up Efficacy - within 3 seconds | Test Passed: > 300 mmHg. | Check Connectors, Tubes and Canister Lid for leakage or damage. Check exhaust outlet for occlusion and run the Device Test again |
STEP 3 - Max. Achievable Vacuum - within 10 seconds | Test Passed: > 500 mmHg. | Check Connectors, Tubes and Canister Lid for leakage or damage. Check exhaust outlet for occlusion and run the Device Test again |
STEP 4 - Air Leakage | Test Passed: > 450 mmHg. | Check Connectors, Tubes and Canister Lid for leakage or damage and run the Device Test again |
NOTE
If the LSU for LAAS does not pass one or more of the steps in this test after suggested actions are taken, contact Laerdal Service Center.
Power Sources / Connector Sockets
The LSU for LAAS is delivered with an AC Power Cord for connection to AC mains and a DC Power Cord for connection to DC mains.
The device can be operated from the internal battery, and can be operated or charged from the following external Power Sources:
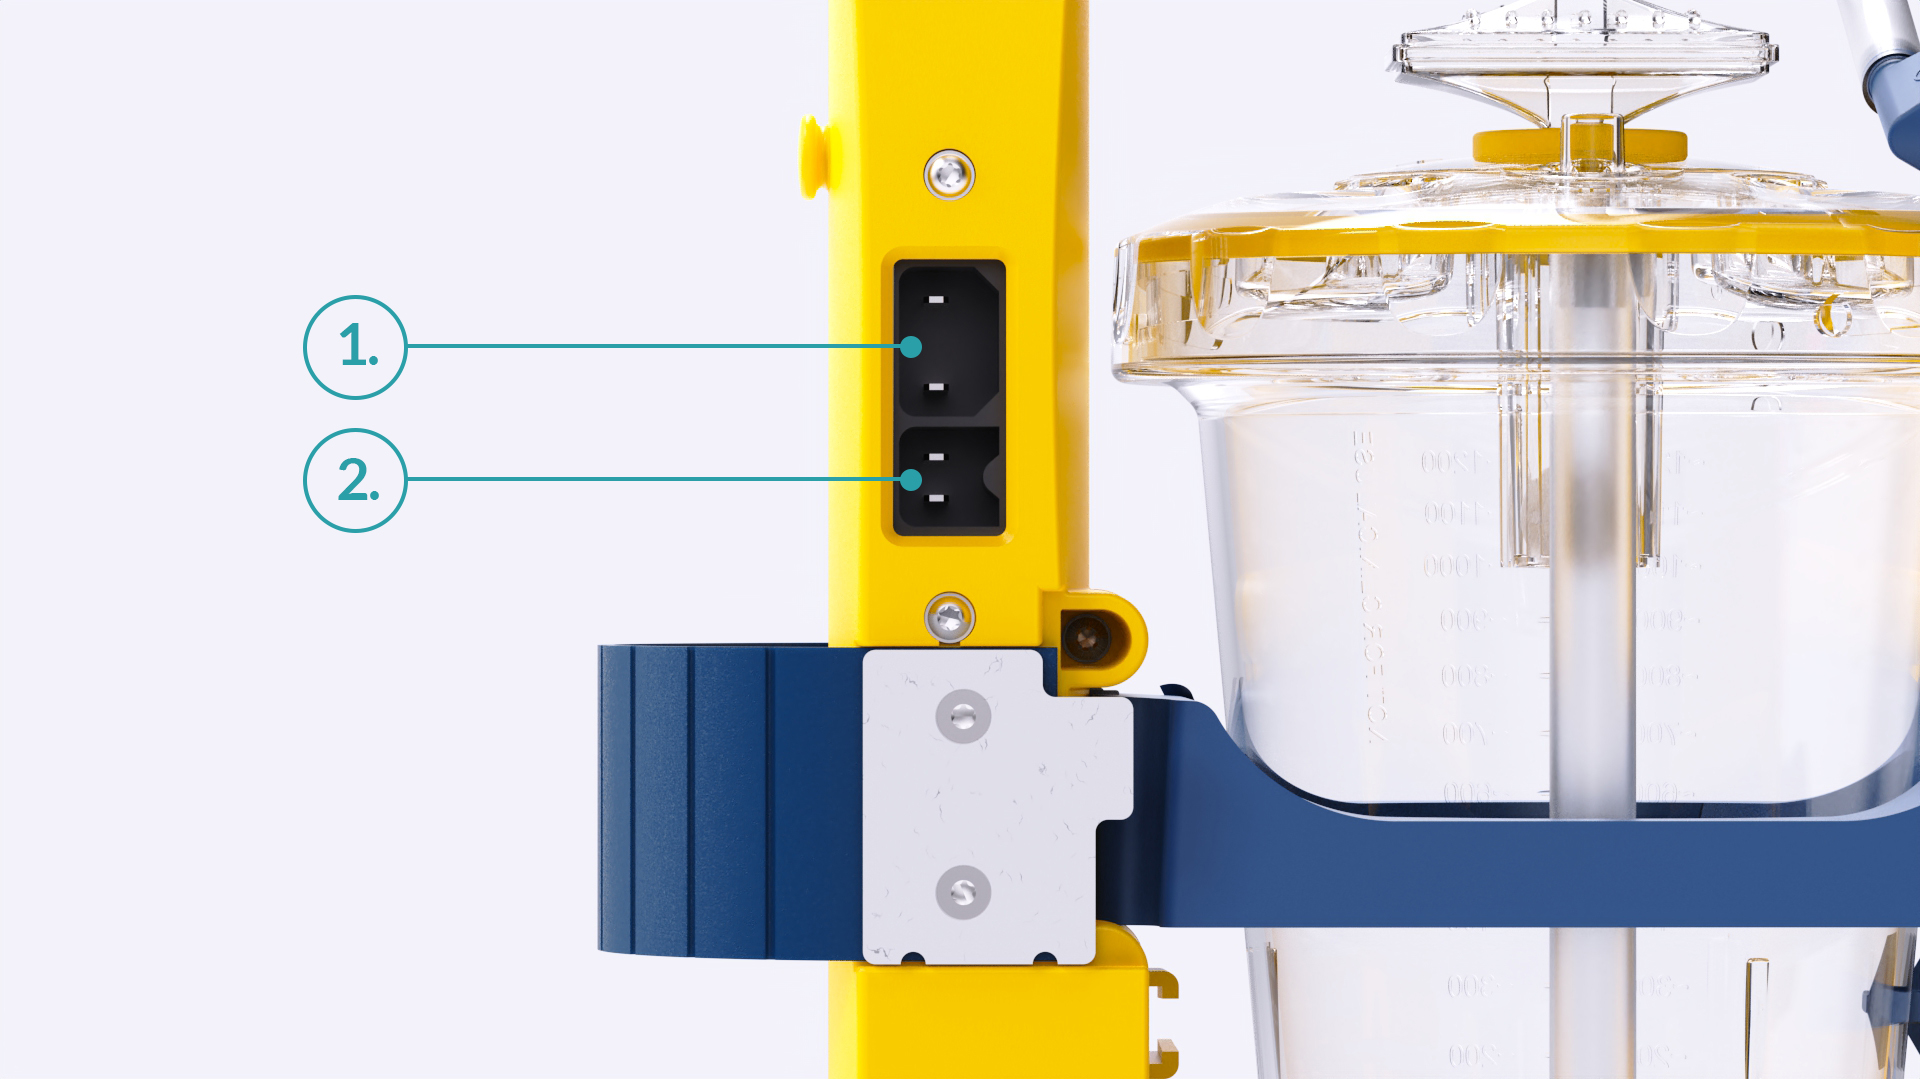
AC mains when used with the AC Power Cord: (Max. length 1.5 m.) 100-240 VAC (50/60 Hz).
DC mains when used with the DC Power Cord: (Max. length 1.5 m.) 12-28 VDC.
External power connection will cause the External Power Indicator to be lit.
Automatic Power-save Function
The LSU for LAAS has an Automatic Power-save Function that switches OFF the pump motor. While in this mode, the Power ON Indicator will flash slowly (approx. once per second).
This function will be activated when the Operating Knob is set to 200, 350 or 500+ mmHg and the actual vacuum level has been continuously higher than 120 mmHg for 2 minutes.
To exit the Power-save Mode and revert to normal operation, set the Operating Knob to any position and then go back to required setting.
Check the Battery Quality
If poor battery quality is suspected, charge the battery for a minimum of 4 hours and then perform the following test without connection to external power:
Run the Device Test and then let the LSU for LAAS operate continuously at 500+ mmHg/free flow for 20 minutes.
If the LSU for LAAS stops before completing the 20 minutes, the battery should be discarded.