Cleaning the fluids system
This deep cleaning must be done before the Patient Simulator is stored.
NOTES
Check whether a Fluid Cleaning Kit is included with your patient simulator for cleaning the blood and urine tubing system. If it is not included, please contact Support to receive one free of charge.
The 14F urinary catheter and 100ml syringe are not included in the kit.
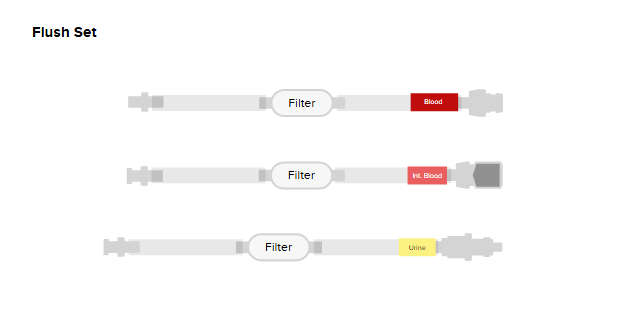
The fluid cleaning kit includes 3 flushing tubes:
The tube labeled Blood is used to clean the Patient Simulator's internal blood tubing and external blood tank.
The tube labeled Blood Tank is used to clean internal blood tank.
The tube labeled Urine is used to clean the Patient Simulator's urine tubing.
CAUTION
Avoid 70% ethanol for cleaning fluids as it can cause failure over time with some of the gaskets.
NOTES
The Clean Bleed™ Mat absorbent sheets are reusable and can be washed.
Cleaning the internal blood tubing
Make sure either the Clean Bleed™ Mat or uterus is connected to the Patient Simulator's blood outlet port.
Unlatch the thigh lid by pulling the release lever under the skin above the knee.
Unclip the internal urine tank by pressing the release button on the right side of the connection point.
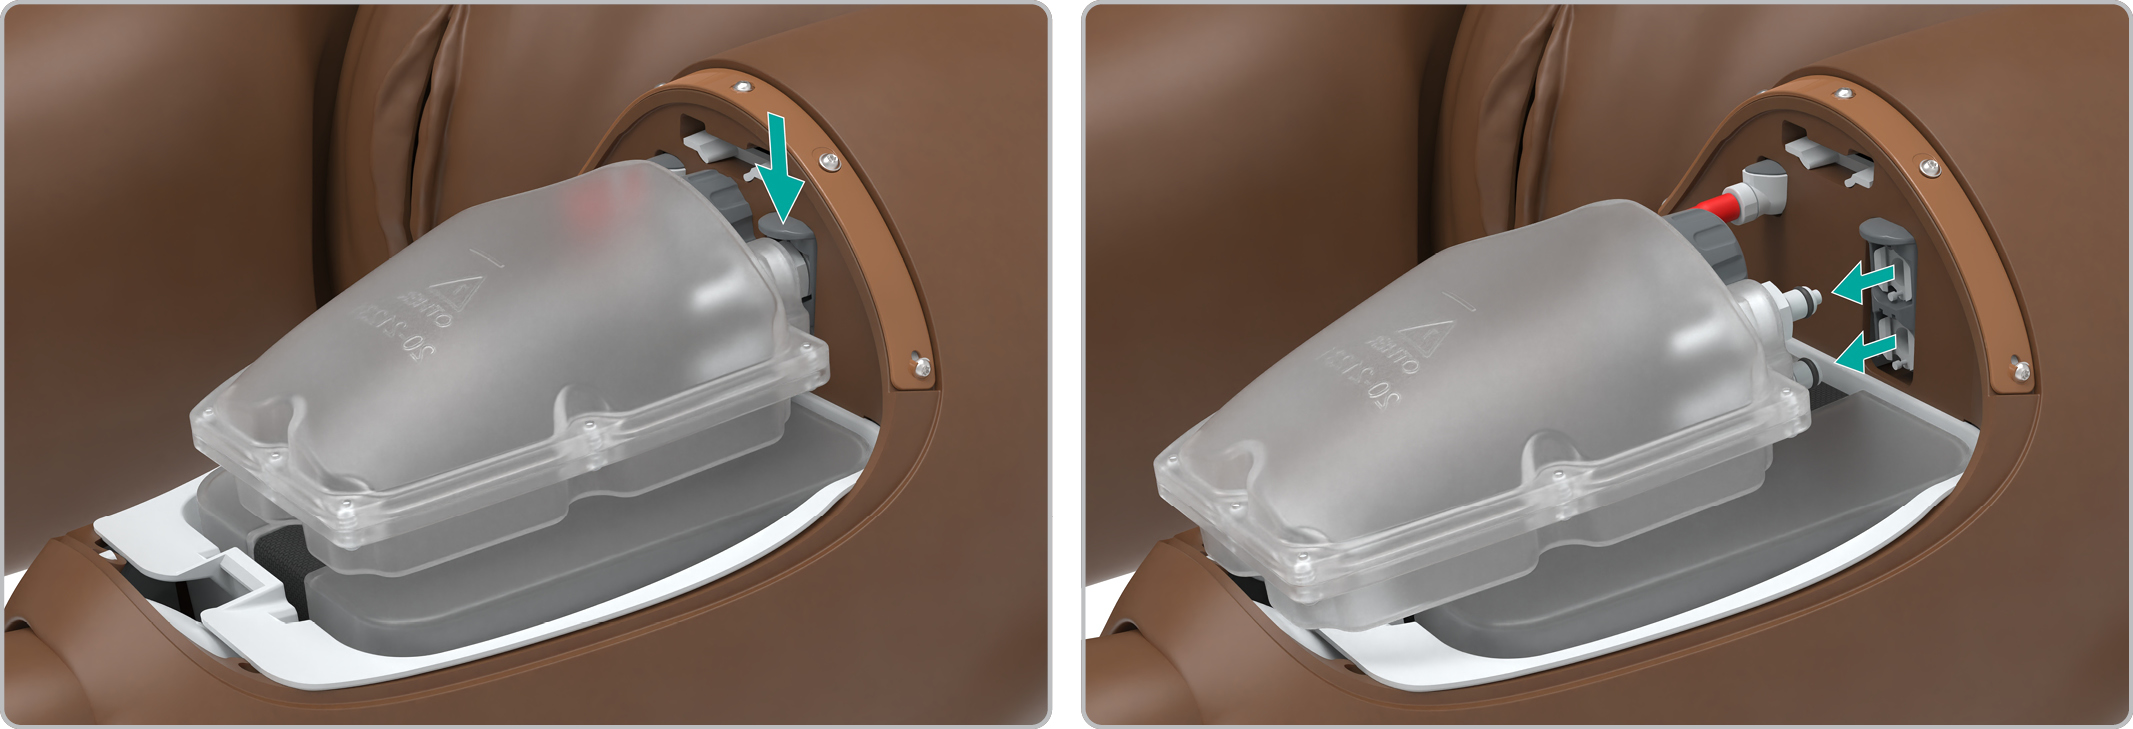
Disconnect the internal blood tank from the Patient Simulator.
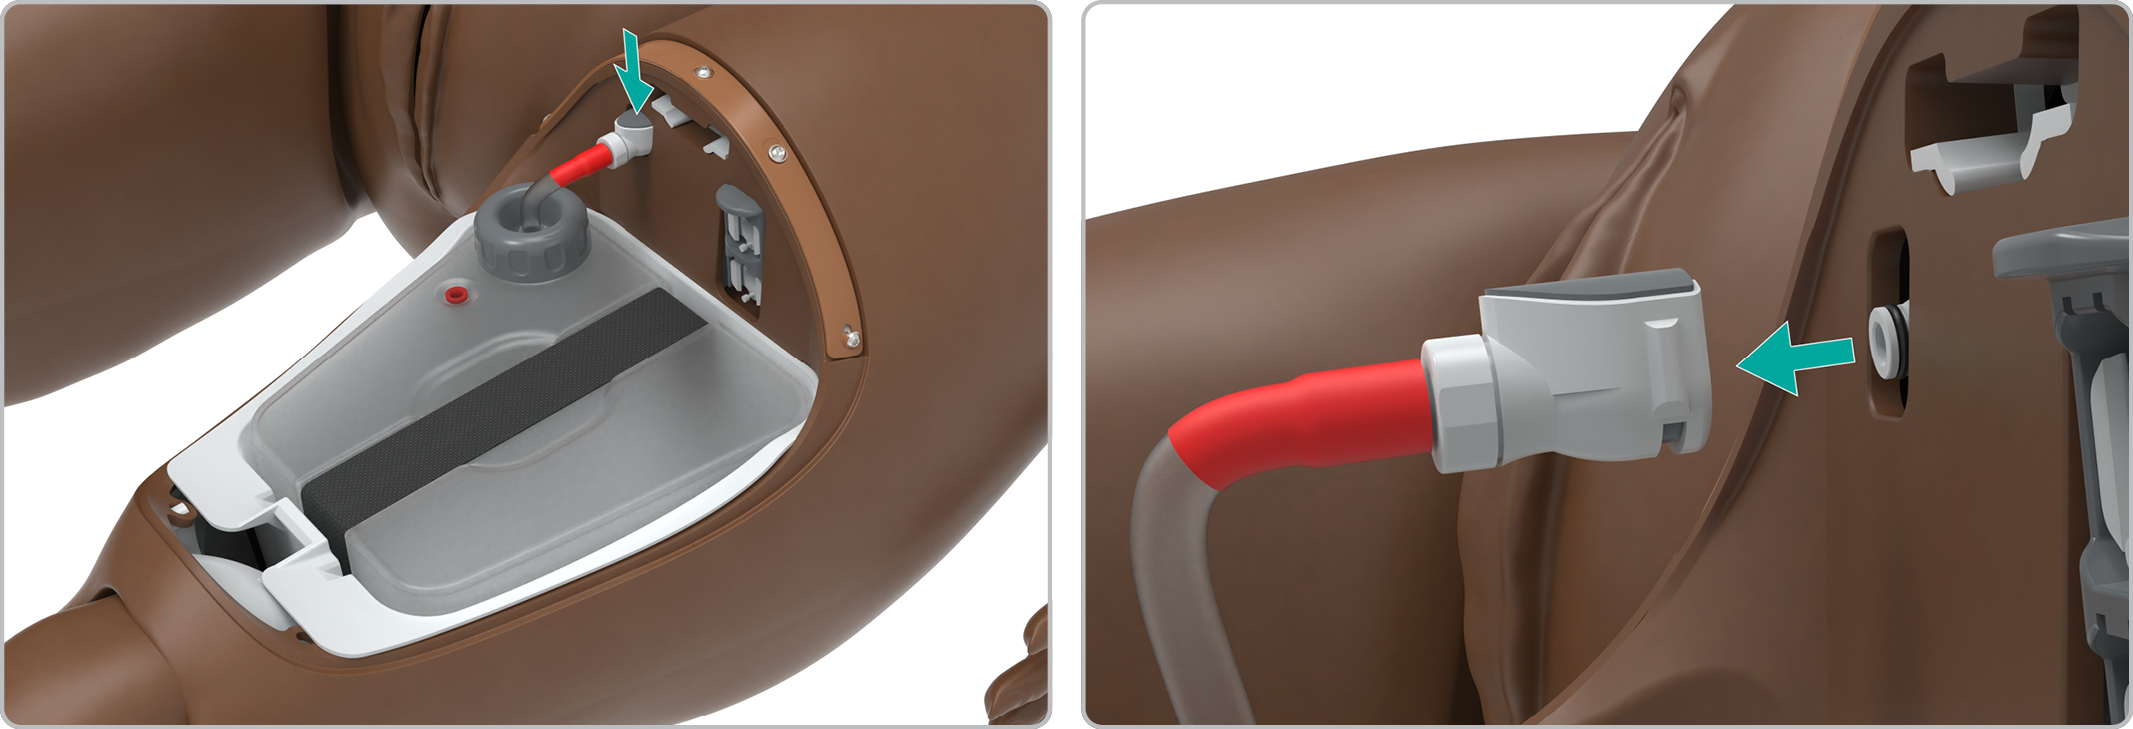
Loosen the internal blood tank cap to allow air to vent from the tank.
Disconnect the external blood tank from the Patient Simulator.
Fill a bottle/container with equal parts distilled water and 70% isopropanol to create a cleaning fluid.
Use a syringe to draw between 60 and 100ml of cleaning fluid from the bottle/container.
Connect the Blood tube from the kit to the internal blood connector in the thigh.
Connect the syringe to the other end of the Blood tube.
Flush the internal blood tubing with the cleaning fluid.
Disconnect the syringe and draw 100ml of air.
Connect the syringe to the other end of the Blood tube.
Flush the internal blood tubing with air.
Clean the PPH uterus or Clean Bleed™ Mat.
Cleaning the internal blood tank
Unlatch the thigh lid by pulling the release lever under the skin above the knee.
Unclip the internal urine tank by pressing the release button on the right side of the connection point.
Disconnect the internal blood tank from the Patient Simulator.
Fill a bottle/container with equal parts distilled water and 70% isopropanol to create a cleaning fluid.
Use a syringe to draw between 60 and 100ml of cleaning fluid from the bottle/container.
Connect the Blood Tank tube from the kit to the internal blood tank tube.
Connect the syringe to the other end of the Blood Tank tube.
Flush the internal blood tank with the cleaning fluid.
Disconnect the syringe and draw 100ml of air.
Connect the syringe to the other end of the Blood Tank tube.
Flush the internal blood tank with air.
Empty the internal blood tank and leave it to dry.
Caution
Flushing cleaning solution into the blood tank may reverse the filter’s flow direction. This is not harmful.
NOTE
Inspect the blood filter located in the tank and replace it if it is old or shows signs of contamination.
Cleaning the external blood tank
Disconnect the external blood tank from the Patient Simulator.
Fill a bottle/container with equal parts distilled water and 70% isopropanol to create a cleaning fluid.
Use a syringe to draw between 60 and 100ml of cleaning fluid from the bottle/container.
Connect the Blood tube to the long external blood tank tube.
Connect the syringe to the other end of the Blood tube.
Flush the external blood tank with the cleaning fluid.
Disconnect the syringe and draw 100ml of air.
Connect the syringe to the other end of the Blood tube.
Flush the external blood tank and long tube with air.
Empty the external blood tank and leave it to dry.
Caution
Flushing cleaning solution into the blood tank may reverse the filter’s flow direction. This is not harmful.
NOTE
Inspect the blood filter located in the tank and replace it if it is old or shows signs of contamination.
Cleaning the urine system
Fill a bottle/container with equal parts distilled water and 70% isopropanol to create a cleaning fluid.
Use a syringe to draw between 60 and 100ml of cleaning fluid from the bottle/container.
Connect the Urine tube from the kit to the Patient Simulator's top urine port.
Insert a 14F sized catheter tube to the Patient Simulator's urethra.
Place the other end of the catheter tube inside a container.
NOTE
This container will collect the fluid coming out of the Patient Simulator.
Connect the syringe to the other end of the Urine tube from the kit.
Slowly flush the urine tubing with the cleaning fluid.
CAUTION
Excessive force while flushing urine fluids may cause fluid to leak form the urethra into the manekin.
Disconnect the syringe and draw 100ml of air.
Connect the syringe to the other end of the Urine tube from the kit.
Flush the urine tubing with air.
NOTES
Urine residue can be seen coming out of the catheter.
Some excess fluid can leak from the catheter. Place a dry towel underneath the urethra.
CAUTIONS
Do not introduce fluids into or onto the Patient Simulator (except as directed in the User Guide) as this may damage it and its components.
Follow cleaning protocols as instructed in the User Guide. Failure to do so may damage the product.
Do not use mineral oil, MEK, or acetone as cleaning agents.
Do not rotate the Patient Simulator if fluid has leaked into the birthing chute or in the lower pelvis.
Pull back the syringe plunger to withdraw any remaining fluid from the simulator before disconnecting the syringe and the kit.
Cleaning the urine tank
Unlatch the thigh lid by pulling the release lever under the skin above the knee.
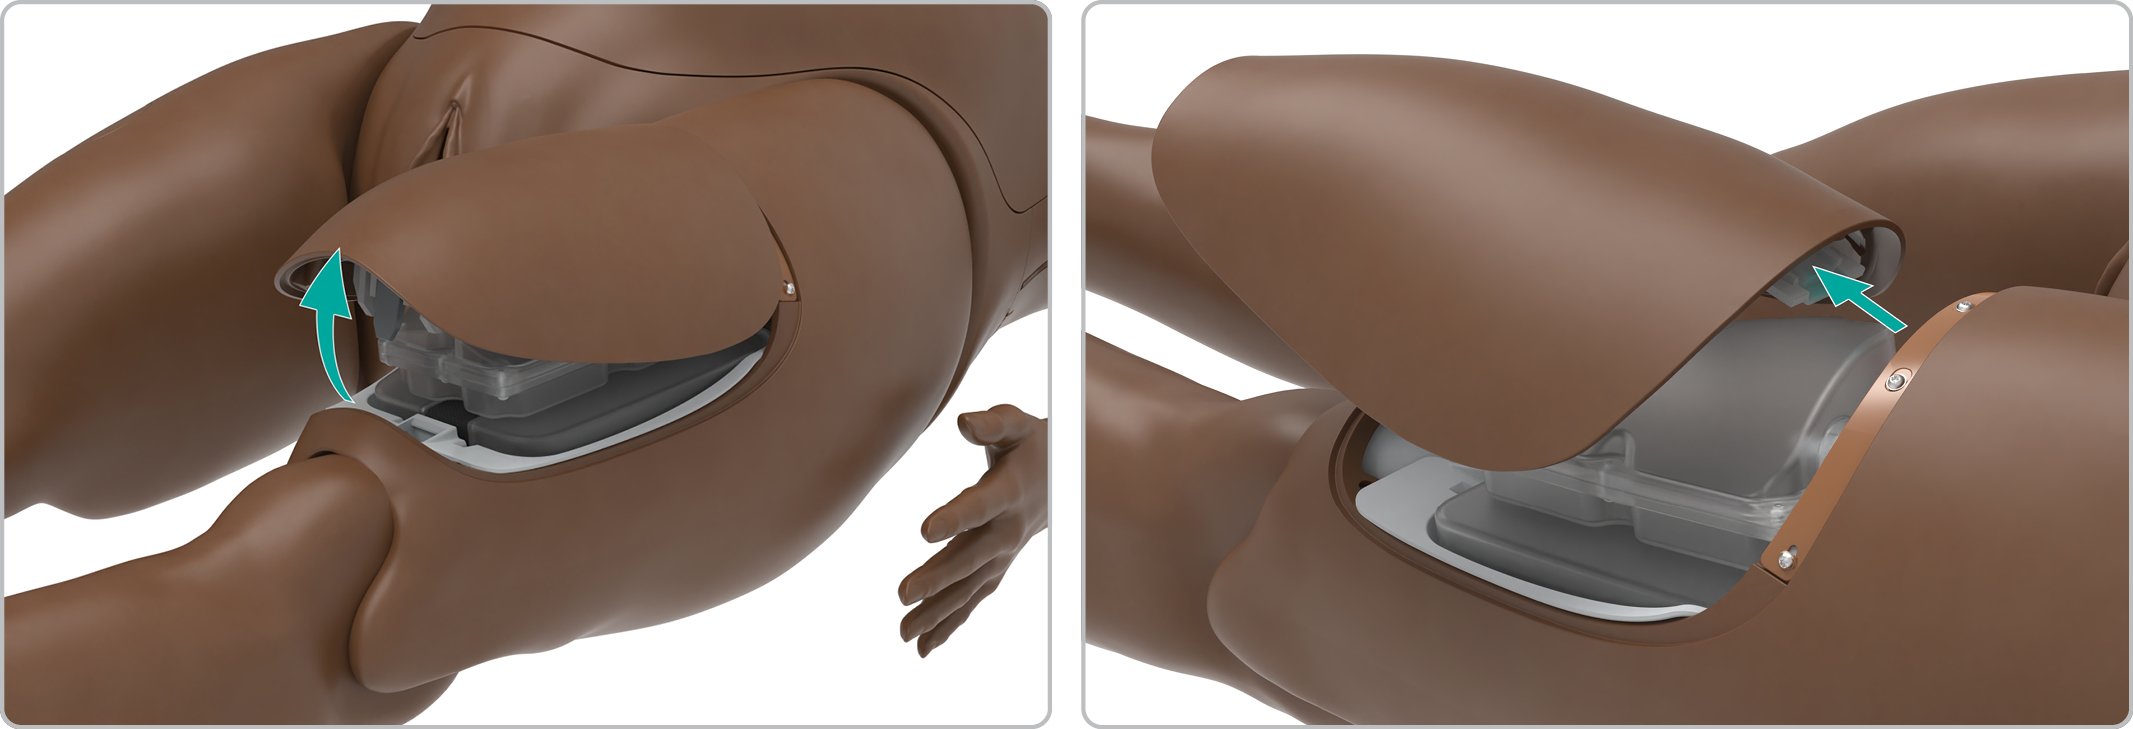
Unclip the internal urine tank by pressing the release button on the right side of the connection point.
Remove the urine tank.
Empty any remaining fluid from the tank.
Fill the tank with equal parts distilled water and 70% isopropanol.
Empty the urine tank and leave it to dry.